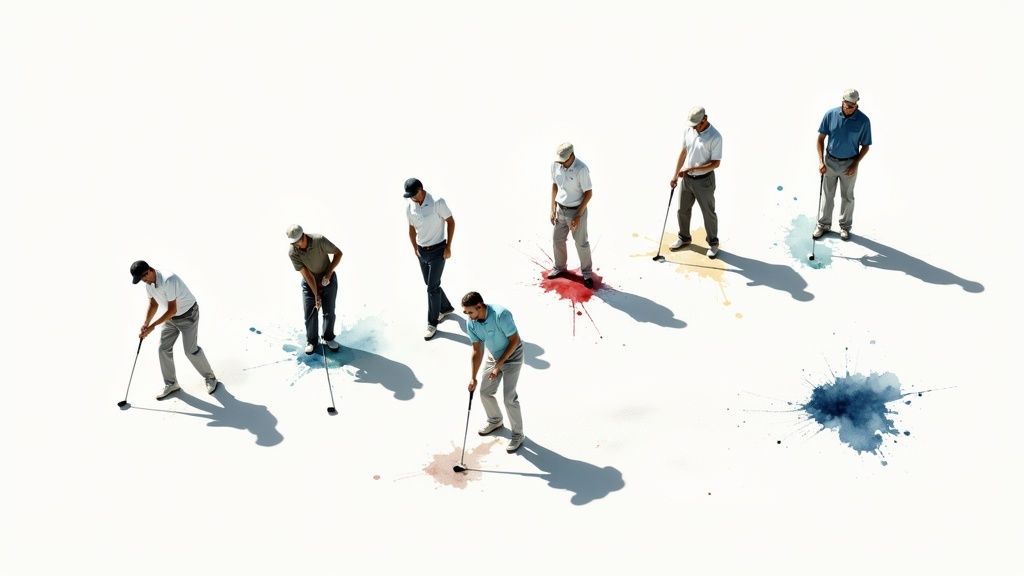
Let’s be honest, those two colorful sticks rattling around in your golf bag? They’re the most powerful, and probably most neglected, training aids you own. Too many golfers drop them down for a quick “am I aimed right?” check and call it a day, missing out on their true genius. Think of them as a Swiss Army knife for your swing: simple, versatile tools that can fix almost any fault, from a wonky setup to a wild slice. Incorporating golf alignment stick drills into your routine can significantly enhance your performance.
This guide isn’t about the basics. We’ve put together the definitive list of golf alignment stick drills to give your practice sessions purpose and structure. It’s like personal process improvement for your game. Just as successful businesses use business process optimization to get consistent results, these drills are designed to systematically iron out the kinks in your golf swing for better shots on the course. Incorporating golf alignment stick drills into your routine can significantly enhance your performance.
This is more than just a random collection of tips—it’s your step-by-step blueprint. You’ll learn specific drills to master your aim, perfect your swing path, and lock in your ball position. Get ready to turn those simple rods into your secret weapon for consistency, precision, and lower scores.
Make sure to practice golf alignment stick drills regularly and practicing golf alignment stick drills helps develop muscle memory.
The Alignment Gate Drill is one of the most popular golf alignment stick drills used by professionals.
- 1. Golf Alignment Gate Drill
- 2. Golf Swing Path Corridor Drill
- 3. Golf Ball Position Checkpoint Drill
- 4. Golf Plane Stick Drill (The Shaft Plane Drill)
- 5. Gate Chipping Drill in Golf
- 6. Feet Together Impact Drill in Golf
- Golf Alignment Stick Drills Comparison Matrix
- Golf: From the Range to the First Tee: Making These Drills Count
1. Golf Alignment Gate Drill
The Alignment Gate Drill is the granddaddy of all golf alignment stick drills, and for good reason: it’s simple, it’s effective, and it fixes the most fundamental part of a good golf swing—your setup. This drill creates a visual “railway track” from your ball straight to the target, giving you instant feedback on where your body and clubface are pointed. You’ll see this on every PGA Tour practice range, and it’s a go-to for legendary instructors like Butch Harmon and David Leadbetter when building a solid foundation from the ground up. Engaging with golf alignment stick drills will set the foundation for better performance.
The main goal here is to get your body (feet, hips, and shoulders) perfectly parallel to your target line. So many amateurs make the mistake of aiming their body at the target, which almost guarantees an over-the-top swing as you try to get the club back on line. That’s where slices and pulls are born. This drill trains you to set up on a parallel track, just like the pros. Utilizing golf alignment stick drills can refine your overall technique.
How to Set It Up
Setting up the Alignment Gate takes about 30 seconds and provides the framework for a powerful practice session. Trust in the process of golf alignment stick drills for better results.
- Set Your Target Line: Lay your first alignment stick on the ground, pointing it directly at your target (a specific flag, a tree, whatever you’re aiming at). This is your ball-to-target line. Place your golf ball right next to the inside of this stick.
- Set Your Body Line: Place the second alignment stick parallel to the first one, about a shoulder-width away. This is the track your body will follow. Your toes should line up with this stick when you take your stance.
- Check and Trust: Step back behind the ball and look down the line. Make sure both sticks are perfectly parallel and the first stick is aimed precisely where you want to go. This pre-shot check is a habit that pays off big time.
Key Tips for Maximum Benefit
- Start Wide, Then Narrow: When you’re first trying this, set the “gate” (the space between the sticks) a little wider to give yourself some breathing room. As you get more consistent, slowly narrow the gate to challenge your swing path control.
- Trust the Setup: Once the gate is set, trust it. Your only job is to swing the club down the target line, not to “steer” it. Focus on making a smooth, committed swing.
- Remove and Replicate: After hitting 10-15 balls with the gate, pull the sticks away and try to recreate that same setup purely by feel. This is how you turn a visual aid into a learned skill.
- Snap a Photo: Take a quick picture or video from behind you. What feels square often isn’t. Seeing the reality of your setup is one of the fastest ways to get it right.
2. Golf Swing Path Corridor Drill
While the Alignment Gate perfects your setup, the Swing Path Corridor Drill fixes the motion of your swing itself. This drill is a total game-changer if you struggle with an “over-the-top” move (the cause of most slices) or getting the club “stuck” behind you (a recipe for hooks). It creates a physical channel that forces your clubhead on the ideal path through the ball, giving you instant, tangible feedback if you go astray. With golf alignment stick drills, you’ll refine skills effectively.
- The goal is to groove a neutral, on-plane swing path. By building a narrow corridor for the club to travel through, you have no choice but to deliver it to the ball from the correct angle. This promotes that pure, compressed feeling at impact and a much more predictable ball flight. This technique is a favorite of modern coaches like Sean Foley and Michael Breed and is a constant presence in the practice routines of PGA Tour stars like Rory McIlroy.
This infographic shows you the simple, three-step process for setting up the Swing Path Corridor.
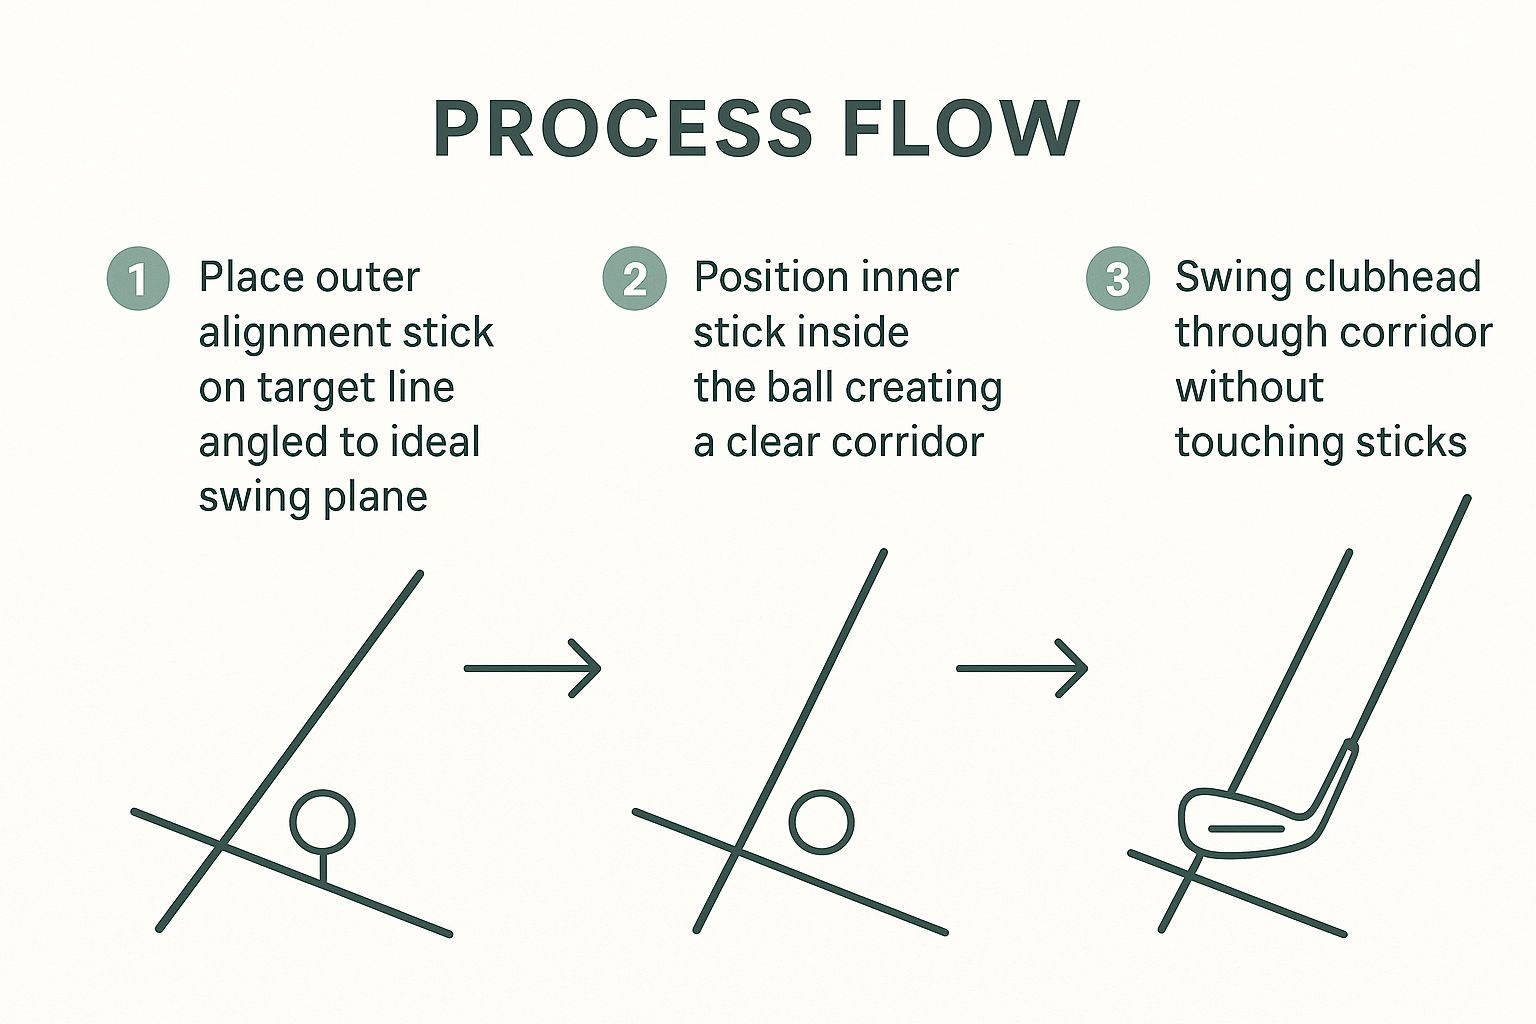
The visual guide shows how the two sticks create a precise channel, guiding your clubhead on the correct plane through the hitting zone. How to Set It Up
Setting up the Swing Path Corridor takes a minute but pays off instantly by correcting your path.
- Place the Outer Stick: Take your first alignment stick and stick it in the ground just outside your golf ball. Angle it to match the shaft angle of your club at address, pointing down your target line. This stick stops you from coming over the top.
- Place the Inner Stick: Put the second stick in the ground just inside your golf ball, also angled to match your shaft plane. This stick prevents you from getting stuck too far inside. The two sticks should form a narrow “corridor” for your club.
- Check and Swing: From your address position, make sure there’s just enough space for your clubhead to pass through cleanly. The tighter you make the corridor, the tougher the drill becomes. With golf alignment stick drills, you’ll refine your skills effectively.
Key Tips for Maximum Benefit
- Start Wide and Safe: Begin with a wide corridor so you can swing comfortably without fear. You can even use foam pool noodles over the sticks at first to protect your clubs and your nerves.
- Tempo Over Power: The goal here isn’t to smash the ball. Make smooth, half-swings at first, focusing on the feeling of the clubhead cruising through the corridor without making contact.
- Adjust for Your Club: The angle of the sticks needs to change with the club. A driver has a flatter swing plane, so the sticks will be angled down more. A wedge has a steep plane, so the sticks will be more upright.
- Video is Your Best Friend: Record your swing from down the line. It’s the only way to see exactly how your club is moving through the corridor and make small, precise adjustments. This turns a good drill into one of the best golf alignment stick drills for swing plane perfection.
3. Golf Ball Position Checkpoint Drill
While we all obsess over alignment, having an inconsistent ball position can wreck your swing before it even starts. The Ball Position Checkpoint Drill is a brilliantly simple way to create a repeatable setup for every single club in your bag. Using just one alignment stick as a visual reference, this drill ensures the ball is always in the perfect spot to promote a clean strike. It’s a foundational concept you’ll find in classics like Ben Hogan’s Five Lessons and it’s a non-negotiable for modern coaches like Pete Cowen.
The goal is simple: eliminate the guesswork from your setup. Playing the ball too far forward often leads to thin shots, while playing it too far back causes fat shots. By creating a clear visual checkpoint, you train yourself to find the perfect ball position without even thinking about it, freeing you up to focus on making a great swing.
How to Set It Up
This setup couldn’t be easier and gives you a clear guide for dialing in your ball position with every club.
- Set the Target Line: First, lay an alignment stick on the ground pointing directly at your target. This is your main target line.
- Create the Checkpoint: Take a second alignment stick and place it on the ground perpendicular to your first stick, forming a “T” shape. This perpendicular stick is your ball position line.
- Position the Ball: Place a golf ball right at the intersection of the two sticks. When you take your stance, this perpendicular stick gives you an undeniable visual for where the ball is relative to your feet. As a starting point: driver off the inside of your lead heel, mid-irons in the center, and short irons just behind center.
Key Tips for Maximum Benefit
- Mark Your Stick: Grab some colored tape and wrap small pieces around the perpendicular stick to mark the ideal positions for your driver, a 7-iron, and a wedge. Now you have a customized, quick-reference system for practice.
- Feel the Difference: Pay close attention to how moving the ball affects your strike. Moving it back encourages a steeper, ball-then-turf strike. Moving it forward promotes a shallower, sweeping motion. Use this drill to find your optimal impact.
- Photograph Your Stance: Take a “down-the-line” and “face-on” photo of your setup with different clubs. This helps you burn the correct look and feel into your brain, making it easier to take to the course.
- Start Every Session This Way: Hit your first few shots of every range session using this drill with a wedge, a 7-iron, and your driver. It calibrates your setup from the very first swing, leading to a much more productive practice.
4. Golf Plane Stick Drill (The Shaft Plane Drill)
The Plane Stick Drill is one of the most powerful, if slightly more advanced, golf alignment stick drills for ingraining a consistent swing plane. Popularized by instructors like Jim Hardy and built on concepts like Ben Hogan’s famous “pane of glass,” this drill gives you immediate, physical feedback on your swing path. It’s a favorite for teaching pros and tour players trying to fix a swing that gets too steep (over-the-top) or too shallow (stuck inside).
The goal is to train your club to travel along a specific angle from address, up to the top of the backswing, and back down into the ball. By creating a physical barrier with the stick, you’re forced to keep your arms and club working together, eliminating the common faults that cause frustrating slices and hooks. You’ll see this drill all over Golf Channel and at high-tech coaching centers like GolfTEC.
How to Set It Up
Getting the setup right is critical here. A bad angle can do more harm than good, so take your time with these steps.
- Find Your Plane Angle: Take your normal address position with a mid-iron, like a 7-iron. Stick an alignment stick in the ground just outside your ball, angling it so it matches the angle of your club shaft at address. It should point backward and upward, extending past your body.
- Position the Stick: The stick should be placed just outside your hands. As you start your takeaway, your club head and shaft should travel directly underneath the alignment stick.
- Check and Adjust: Look from down the line to confirm the stick’s angle matches your shaft at address. It should create a perfect visual guide that your club can trace up and down.
Key Tips for Maximum Benefit
- Use Video Feedback: This drill is 10x more effective with video. Set your phone up to record from a down-the-line view. This lets you see how your club shaft relates to the plane stick at key positions: halfway back, the top, and halfway down.
- Start with Short Clubs: Begin with a pitching wedge or 9-iron. Shorter clubs are easier to control and will help you get the feel for the correct plane before you move on to longer, more difficult clubs.
- Focus on Key Checkpoints: Your goal is to keep the club shaft parallel to the alignment stick when it’s halfway back and again when it’s halfway down. You’re not trying to hit the stick; you’re just using it as a reference.
- Ask a Pro: If you’re not sure you’ve got the setup right, ask a golf instructor for help. They can dial in the proper plane angle for your unique swing, which is essential for making this drill work. This is also a fantastic drill to do when you want to practice golf at home by making half-swings without a ball.
5. Gate Chipping Drill in Golf
While most alignment stick drills focus on the full swing, this one is all about dialing in your short game. The Gate Chipping Drill is designed to sharpen your technique by giving you instant, undeniable feedback on your club path and launch direction. Short game wizards like Dave Pelz and Phil Mickelson love this drill because it forces you to make a fundamentally sound motion to succeed.
The goal is to train your club to travel on the correct path through impact and to control exactly where the ball starts its journey. By creating two separate “gates” with your alignment sticks, you build a powerful mental and physical guide for hitting crisp, predictable chips that land softly right where you want them. This drill helps you feel what a proper strike is, preventing shanks, chunks, and thin shots caused by a poor club path.
How to Set It Up
Setting up the chipping gates takes a bit more care than other drills, but that precision is exactly what makes it so effective for your scoring game.
- Create the Launch Gate: Place two alignment sticks in the ground about three feet in front of your golf ball. The sticks should be just wide enough for the ball to pass through, creating a narrow gate. This first gate ensures your chip starts on the correct line.
- Create the Landing Zone Gate: Pick your desired landing spot on the green. Place your other two alignment sticks (or just one) to create a target gate where you want the ball to land. This second gate trains your distance and trajectory control.
- Check and Align: Step back to make sure your ball, the launch gate, and the landing zone gate all line up perfectly with the hole. This setup gives you a complete visual pathway for the entire shot.
Key Tips for Maximum Benefit
- Start Wide, Then Narrow: In the beginning, make the launch gate wide enough to build some confidence. As you get better, slowly narrow the gate to challenge your precision.
- Vary Your Clubs: Practice this drill with your different wedges (pitching wedge, gap wedge, sand wedge) to see how each club’s loft affects the trajectory and roll through the same gates.
- Make it a Game: Track your success. Count how many chips out of 10 you can get through both gates. Turning practice into a measurable challenge is the fastest way to improve.
- Focus on Acceleration: A huge chipping mistake is slowing down into the ball. Focus on a smooth, rhythmic motion that accelerates the clubhead through the ball and the first gate. This is one of the most essential tips for chipping like a champ.
- Practice from Different Lies: Don’t just do this from perfect fairway lies. Set the drill up in the rough, on a tight lie, or on an upslope to build a more versatile and reliable short game.
6. Feet Together Impact Drill in Golf
The Feet Together Impact Drill is a fantastic tool for diagnosing and fixing your swing by boiling it down to its core elements: balance, timing, and pure contact. By making you swing with a very narrow stance, it kills any excessive lower body movement and forces your arms and torso to work together. This drill, made famous by the legendary ball-striker Moe Norman, is a go-to for top instructors like Hank Haney who want to help players find the center of the clubface again.
The main goal is to isolate your arm swing and body turn, forcing them to sync up for a solid strike. When your feet are together, you can’t lunge or sway to create power; you have to rely on proper sequencing and a stable core. Using a single alignment stick ensures that while you’re focused on your swing, your aim stays true, making this one of the most efficient golf alignment stick drills for improving ball striking.
How to Set It Up
The setup is incredibly simple but provides the crucial visual you need to connect good mechanics with proper alignment.
- Set the Target Line: Place one alignment stick on the ground, pointing directly at your target. This is your ball-to-target line.
- Position the Ball: Place a golf ball just to the inside of the alignment stick.
- Take Your Stance: Address the ball with your feet touching or just an inch apart. Your toes should be parallel to the alignment stick, ensuring your body is square to the target.
Key Tips for Maximum Benefit
- Start Short and Slow: Begin with a pitching wedge or 9-iron and make smooth swings at about 50-75% speed. The goal is crisp contact, not distance.
- Sync Your Turn: Feel your arms and chest rotating back and through as one unit. Without your legs driving the swing, you’ll learn to create speed with proper body rotation and a free arm swing.
- Stay Centered: Balance is everything in this drill. Keep your head still and your weight centered over your narrow stance throughout the swing. If you’re falling over, you’re swinging too hard or out of sequence.
- Alternate and Integrate: Hit 10-15 balls with your feet together, really focusing on the feeling of that pure strike. Then, switch to your normal stance and try to recreate that same synchronized feeling. This helps the benefits of the drill carry over to your real swing.
Golf Alignment Stick Drills Comparison Matrix
| Drill Name | Implementation Complexity | Resource Requirements | Expected Outcomes | Ideal Use Cases | Key Advantages |
|---|---|---|---|---|---|
| Alignment Gate Drill | Simple | 2 alignment sticks | Improved body and clubface alignment | Beginners; full swings, chips, putts | Easy setup, immediate visual feedback, versatile |
| Swing Path Corridor Drill | Moderate to complex | 2+ alignment sticks | Correct swing path; reduces slices/hooks | Intermediate to advanced swing fixes | Tactile feedback, custom path adjustments |
| Ball Position Checkpoint Drill | Simple | 1 alignment stick | Consistent ball position for various clubs | Beginners wanting setup consistency | Simple visual cue; reduces mishits |
| Plane Stick Drill | Advanced | 1 alignment stick (+ optional video) | Correct swing plane; consistent ball flight | Advanced players focusing on swing plane | Visual/spatial reference; reduces compensations |
| Gate Chipping Drill | Moderate | 4 alignment sticks | Improved chipping accuracy and trajectory | Short game training | Immediate feedback, measurable goals |
| Feet Together Impact Drill | Moderate | 1 alignment stick | Better balance and pure striking | Developing strike quality | Reveals balance issues; promotes proper sequencing |
Golf: From the Range to the First Tee: Making These Drills Count
You now have a powerful arsenal of six distinct golf alignment stick drills, each designed to tackle a specific, critical element of your game. We’ve moved far beyond simply pointing sticks at a target. From the precision of the Alignment Gate Drill to the nuanced feedback of the Swing Path Corridor and the foundational checks of the Ball Position Checkpoint, you’ve learned how two simple rods can provide tour-level feedback on every swing. By focusing on golf alignment stick drills, you can achieve your golfing goals.
The real transformation happens when these exercises stop feeling like drills and start feeling like your natural setup. The goal is to internalize the sensations these drills create. You should be able to feel an on-plane takeaway, sense correct ball position without looking, and instinctively know your club is traveling down the proper path toward the ball. This is how you bridge the gap between mechanical practice and fluid, athletic performance on the course.
Synthesizing Your Practice for Golf On-Course Success
Mastery won’t come from a single, marathon session. Instead, consistent, focused effort is the key. Your path forward should be structured and intentional. The effectiveness of golf alignment stick drills can be seen in improved accuracy.
- Dedicated Drill Time: Begin each practice session by dedicating 15-20 minutes to one or two of these drills. If your iron play is struggling, focus on the Swing Path Corridor. If your short game is costing you strokes, commit to the Gate Chipping Drill.
- Rotate Your Focus: Don’t just stick to the drill you find easiest. Challenge yourself by rotating through all six over the course of a few weeks. This ensures you’re building a well-rounded, fundamentally sound golf game, not just a one-dimensional swing.
- The “Feel” Transition: After performing a set of repetitions with the alignment sticks providing physical feedback, remove them. Hit another 5-10 shots trying to replicate the exact same feeling without the visual or physical guides. This is the most crucial step in making these improvements permanent. Strive for excellence by incorporating golf alignment stick drills into your game.
The True Value of Deliberate Practice in Golf
Ultimately, the power of these golf alignment stick drills lies in their ability to provide instant, unbiased feedback. You no longer have to guess if your swing path was out-to-in or if your club face was open at impact; the sticks will tell you the truth. By embracing this feedback, you are removing the guesswork and replacing it with purpose. These techniques are essential for effective golf alignment stick drills.
This deliberate practice builds more than just muscle memory; it builds unwavering confidence. When you stand over a critical approach shot on the 18th hole, you won’t be hoping for a good swing. You will be trusting the countless, correct repetitions you’ve ingrained on the range. You will know your alignment is square and your path is true because you have proven it to yourself time and time again. That is the real secret to unlocking lower scores and finding more enjoyment in this challenging, wonderful game. To ensure progress, regularly practice golf alignment stick drills.
Ready to dive deeper into the world of smart golf practice and equipment? At Golf Inquirer, we specialize in providing in-depth guides, unbiased reviews, and actionable tips just like these. Visit Golf Inquirer to explore more content designed to help you play your best golf ever.