
Ever wonder how the pros make it look so easy? It’s not magic. When you want to learn how to hit a fade or a draw, it all boils down to two key ingredients: the path your club swings on and the angle of your clubface when it meets the ball. It’s that simple, and yet, that’s where the real art of golf begins. Well, you are at the right place. Explore our 5 Tips to Perfect Your Skills: How to Hit a Fade or Draw
To master how to hit a fade or draw, focus on the right grip and stance adjustments that set you up for success. Understanding how to hit a fade or draw can drastically improve your game.
Practice is key to learning how to hit a fade or draw consistently. Incorporating drills can help solidify your understanding of how to hit a fade or draw in various conditions.
As you learn how to hit a fade or draw, remember to enjoy the process of improving your skills.
For a fade (a shot that curves gently to the right for a righty), you need a swing path that moves slightly from out-to-in, with a clubface that’s open to that path but still aimed left of your final target. For a draw (a shot curving left), it’s the opposite—an in-to-out path with a clubface that’s closed to the path but aimed right of the target.
Getting a feel for this relationship is the secret sauce to shaping shots on command.
Why Shot Shaping Will Change Your Game in Golf
Learning to curve the ball is about so much more than just looking cool on the range. It’s one of the quickest ways to start shaving strokes off your score because it forces you to think your way around the course. Having a clear understanding of how to hit a fade or draw will give you an edge over your competition.
Most of us get stuck on the idea that a perfectly straight shot is the holy grail. But if you watch the pros, you’ll see they almost never hit it dead straight. They know that using the curve is often the smarter play. It’s the difference between just whacking the ball and actually playing the game of golf.
Think about that tricky par 4 with a sharp dogleg right. A straight drive is a recipe for disaster—you’ll either run right through the fairway into the rough or find a bunker. But if you can hit a soft, controlled fade that hugs the corner? You’ll leave yourself in A-plus position for your approach. That’s not luck; that’s smart course management.
Or what about a pin tucked behind a deep bunker on the left side of the green? Going right at it is a high-risk, low-reward shot. A much better play is a high, soft draw that starts out to the right of the flag and gently curves back toward it. This shot uses the entire middle of the green as a safe zone, letting you be aggressive while still playing the percentages.
The Real-World Advantage in Golf
Once you can control your ball flight, the entire golf course opens up. You stop seeing hazards and start seeing opportunities. When you know how to hit a fade or draw, you’ll have the confidence to tackle any shot on the course.
- Attack More Pins: Those Sunday pin placements tucked in corners no longer feel out of reach. You can use a fade to hold a firm green or a draw to get to a back-left flag.
- Navigate Doglegs with Ease: Shaping your tee shot with the fairway is a game-changer. It sets you up for much shorter and simpler approach shots into the green.
- Gain “Workable” Distance: A draw naturally flies a bit lower with less backspin, meaning you’ll get more roll and a few extra yards—a huge advantage on long par 4s.
This image breaks down the key technical differences between the two shot shapes.
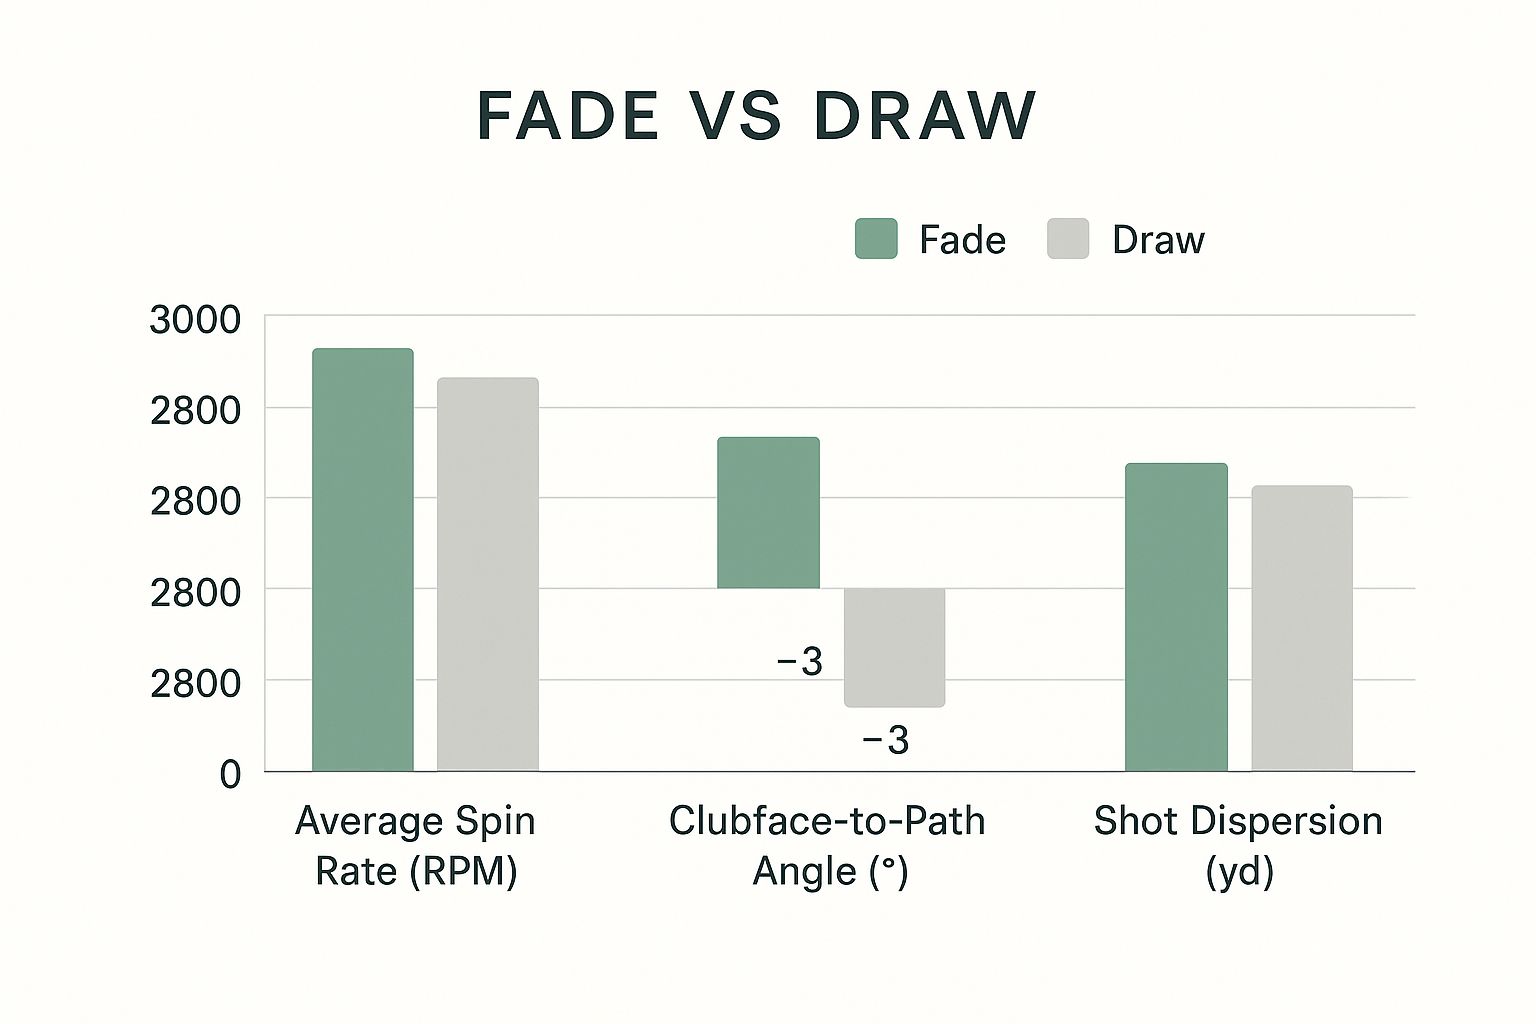
Before we dive into the “how-to,” let’s quickly compare the core differences between a fade and a draw.
Quick Look at Golf Fades vs Draws
| Characteristic | Fade (Curves Right for a righty) | Draw (Curves Left for a righty) |
|---|---|---|
| Ball Flight | Higher, softer landing | Lower, more penetrating |
| Typical Distance | Slightly shorter carry | Longer total distance with more roll |
| Spin Rate | Higher backspin | Lower backspin |
| Common Use | Holding firm greens, navigating dogleg rights | Gaining distance, attacking left-side pins |
| Feel | A “wiping” or “cutting” motion across the ball | A “trapping” or “releasing” feeling through the ball |
This table gives you a simple at-a-glance reference for what to expect from each shot. Remember, neither is inherently “better”—they are just different tools for different situations.
The core idea is simple: A fade is produced by a slightly steeper swing path with an open clubface relative to that path, while a draw uses a shallower path with a closed face. This skill is prized globally because it allows players to navigate hazards with precision. You can discover more insights about fade and draw mechanics on hackmotion.com if you want to get into the weeds on the physics.
Building Your Golf Pre-Shot Shaping Routine
The secret to hitting a consistent fade or draw isn’t some complex, in-swing manipulation. It’s all baked into your setup before you even start the takeaway. If you want predictable ball flight, you need a repeatable pre-shot routine that basically tells the ball where to go.
Think of it as programming the shot—get the inputs right at address, and the output at impact will take care of itself.
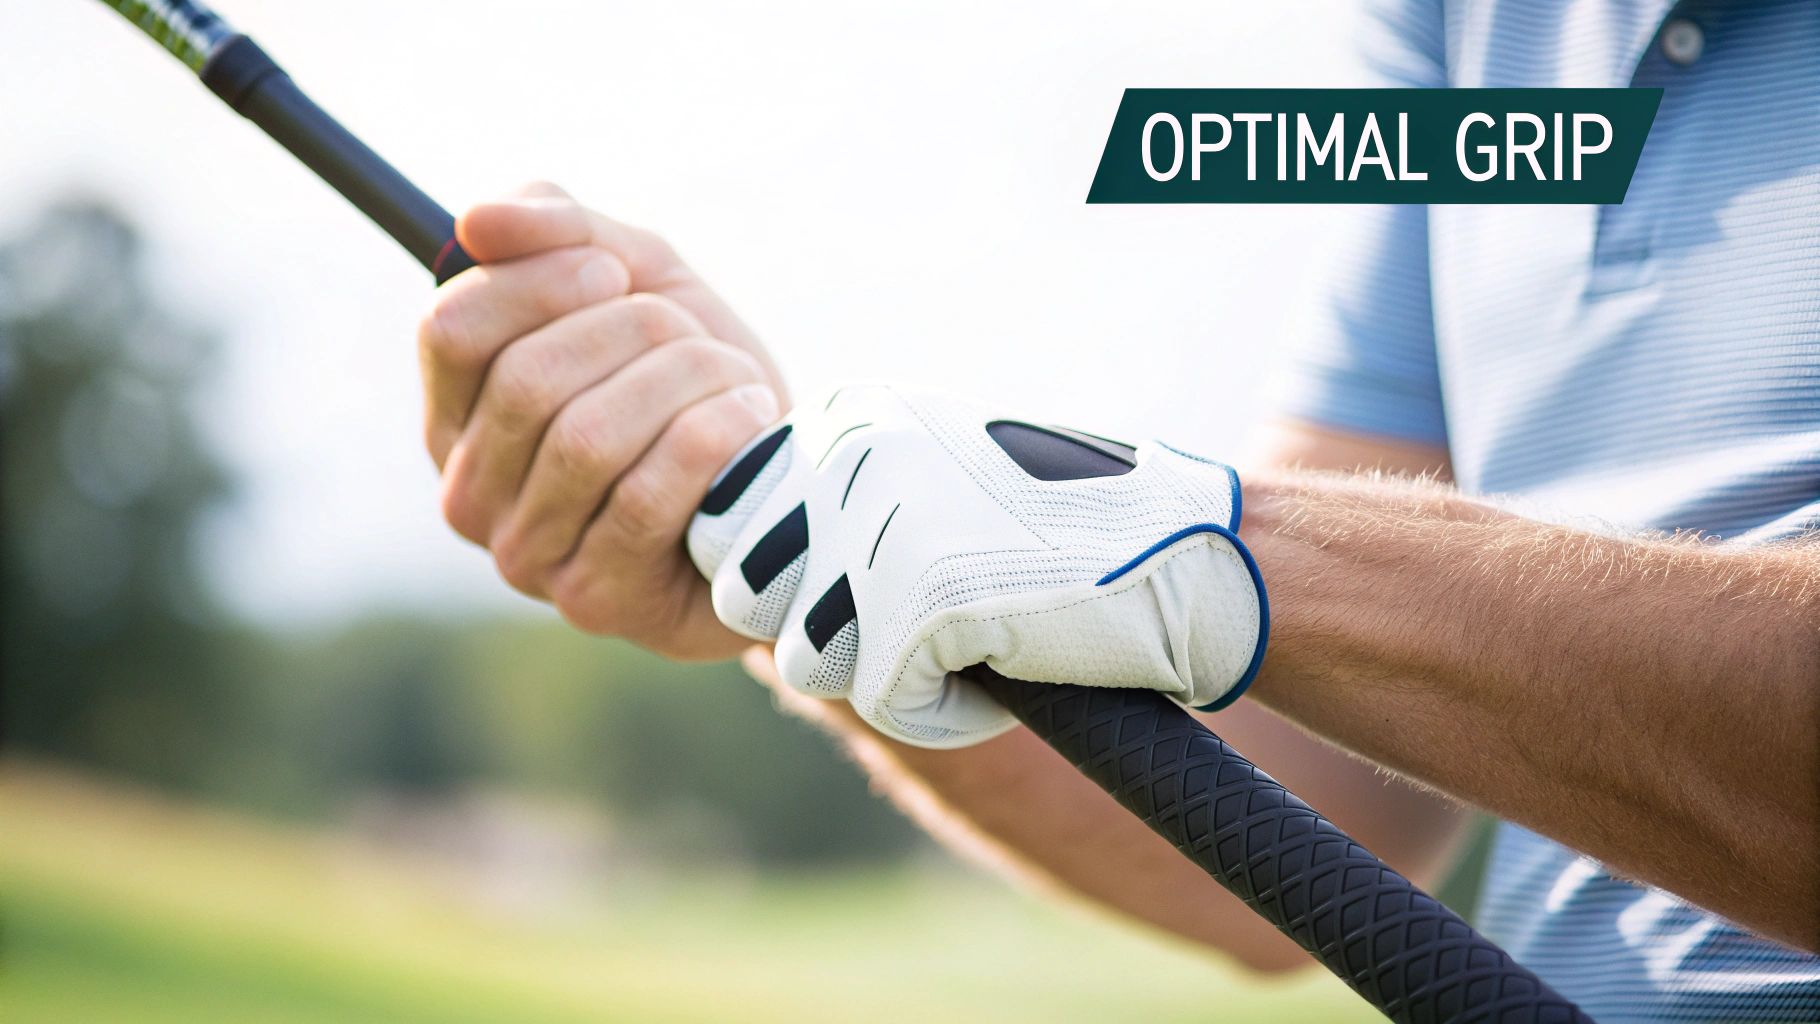
Your setup is the foundation of the entire swing. Even tiny adjustments here can have a massive impact on the ball, making it the simplest and most effective way to shape shots without overhauling your natural motion. It all comes down to creating the right conditions for the club to travel on the path you want.
We’ll focus on three core components: your alignment, your ball position, and your grip.
Setting Up for a Controlled Fade in Golf
To hit that soft, reliable fade that lands gently on the green, your setup needs to encourage an “out-to-in” swing path relative to your target. It might sound a bit technical, but it’s really just a matter of aiming your body differently than your clubface.
Here’s the checklist for a perfect fade setup:
- Clubface Alignment: This is the most important part. Aim your clubface directly at your final target. If the pin is your destination, the clubface points right at it.
- Body Alignment: Now for the magic. Adjust your body—feet, hips, and shoulders—to aim slightly left of that target. I always picture a set of train tracks: the clubface is on the track heading straight to the hole, while my body is aligned on the track just to the left.
- Ball Position: Try nudging the ball about a half-inch forward in your stance. This gives your hands a little more time to get the club outside on the way back, which helps promote that out-to-in path.
- Grip Pressure: A slightly firmer grip with your lead hand (the left hand for righties) can prevent the clubface from closing too quickly through impact. This helps keep it “open” relative to your swing path, which is exactly what produces the spin for a fade.
The goal here is to create a small, intentional mismatch between your body’s aim and the clubface’s aim. Your setup naturally gets the club swinging across the target line, producing that beautiful left-to-right curve.
Setting Up for a Powerful Draw in Golf
For that penetrating, yardage-chewing draw, we just flip the script. The setup is designed to promote an “in-to-out” swing path, letting the club attack the ball from the inside.
This setup is just as methodical:
- Clubface Alignment: Start by aiming the clubface slightly to the right of your final target. So, if the pin is in the middle of the green, you might aim the clubface at the right edge of the green.
- Body Alignment: Next, align your body (feet, hips, and shoulders) even further to the right of where your clubface is pointing. This creates the “closed” stance you need to swing from the inside.
- Ball Position: To really encourage this inside attack, move the ball about a half-inch back in your stance from its normal spot. This small change helps you catch the ball slightly earlier in your swing arc.
- Grip Strength: A classic trick for a draw is to “strengthen” your grip. For a right-handed player, this means rotating both hands a touch to the right so you can see an extra knuckle or two on your lead hand. This subtle shift makes it so much easier to release the club and let the face close naturally through impact.
By deliberately building these adjustments into your pre-shot routine, you take all the guesswork out of shaping shots. It becomes less about forcing a move during the swing and more about letting your setup do all the heavy lifting for you.
The Golf Swing Mechanics for a Controllable Fade

Alright, you’ve pre-set your fade in the setup. Now for the fun part: the swing itself. The best news? You don’t need to completely overhaul your motion. The idea is to make a smooth, natural swing and let your new setup do the work.
The fundamental goal here is to create a gentle out-to-in swing path. All that means is the clubhead will travel slightly away from you on the way down, then move back across the ball through impact.
A simple swing thought that has always worked for me is to just swing along the line of my feet. Since you’ve already aligned your body left of the target, this thought naturally encourages the club to follow that out-to-in path without feeling forced.
Nailing the Takeaway and Downswing in Golf
The path for a reliable fade starts right from the beginning. On your takeaway, get the sensation that the clubhead is staying just a little bit outside your hands. This isn’t some big, loopy move; it’s a subtle feeling that the club is tracking away from you a touch more than it would for a dead-straight shot.
Then, as you begin the downswing, the absolute key is to fight that common urge to come “over the top.” That’s the classic amateur mistake where the shoulders and arms lunge at the ball, creating a steep, ugly slice. A powerful fade feels smooth and controlled, never rushed.
The real difference between a playable fade and a power-robbing slice is often just tempo. A fade is a graceful curve; a slice is a violent one. Focus on a smooth transition from the top, letting gravity do some of the initial work to get the club started down.
Feeling the Finish in Golf
To really ingrain the feeling of a proper fade, pay close attention to where you finish. Because you’re swinging along your body line (which is pointed left), your hands and the club should naturally finish lower and more to the left than they would for a straight ball or a draw.
This “low-left” finish is incredible feedback. It’s a clear sign that you kept your body turning through the shot and didn’t just flip your hands at the ball—a move that would shut the clubface and turn your intended fade into a dead pull.
A fantastic way to build this feel is with a couple of alignment sticks.
- The Gate Drill: Stick one alignment rod in the ground a few feet in front of your ball, just outside the target line. Put the second rod a few feet behind the ball, just inside the target line.
- Your Goal: The mission is simple: swing the clubhead inside the back stick on the way back and outside the front stick on the follow-through.
- Instant Feedback: This gate gives you an undeniable visual for that out-to-in path. If you clip either stick, you know your path strayed.
This drill is so effective because it forces you to feel the right motion instead of just thinking about it. Start with slow, half-swings to get the hang of it before building up to full speed. That’s how you burn this into muscle memory so you can pull off the shot when it really counts.
Executing a Powerful and Consistent Draw in Golf

While the fade is your precision tool, the draw is your power play. A perfectly struck draw has that beautiful, penetrating flight that seems to hang in the air forever before it lands softly and rolls for days. The secret to this coveted shot isn’t brute force; it’s mastering the in-to-out swing path.
This simply means your clubhead travels from inside the target line as it approaches the ball, and then moves back outside the line after making contact. It’s the complete opposite of the fade, requiring a totally different feel to pull off consistently.
The key is to get the club to “shallow” on the downswing, letting it drop into the “slot” behind your body. This one move is what separates a pure draw from the dreaded over-the-top lunge that leads to a snap hook.
Cultivating the Inside Attack Fade in Golf
To get this motion dialed in, you need a simple mental cue. One of the best swing thoughts I’ve ever used is to imagine you’re hitting the ball out to right field (if you’re a righty). This visual cue almost forces your body to drop the club to the inside and extend through impact.
As you swing with this thought in mind, let your hands release naturally. You’re not trying to violently flip the clubhead over. Just allow your right hand to cross over your left after you’ve hit the ball, as your body rotates through. This smooth, unforced release is what puts that right-to-left spin on the ball.
Initiating Golf With the Lower Body
A powerful draw starts from the ground up, not with your arms and hands. The downswing must begin with your lower body. As you reach the top of your backswing, your very first move should be a small hip shift towards the target.
This lower-body-first sequence is critical for two reasons:
- It Creates Space: By clearing your hips, you open up a huge lane for your arms and club to drop down from the inside.
- It Generates Lag: This proper sequencing stores energy like a coiled spring, letting you unleash it at the ball with explosive speed.
When you get the sequence right—hips, arms, hands—the draw feels both effortless and incredibly powerful. That’s the feeling of an efficient golf swing, where every part of your body is working in harmony.
Launch monitor data backs this up. A recent analysis using a Garmin R10 showed that draws carried an average of 255 yards, while fades carried 248 yards. That extra distance comes from a more optimal ball flight, even though both shots had a nearly identical smash factor. For a closer look at the numbers, you can see the full performance data comparison on YouTube.
Here’s a great drill to build this feel: place an object like a headcover or a water bottle about a foot behind and just outside your golf ball. The goal is to make your swing without hitting it. This drill gives you instant, undeniable feedback, forcing you to shallow the club from the inside to avoid a collision. It’s a fantastic way to finally stop coming over the top and start hitting that commanding draw.
Drills to Take Your Golf Shot Shaping to the Course
Knowing the theory behind hitting a fade or a draw is one thing. Actually trusting yourself to pull off the shot on a tight par-4 with water on the left? That’s a whole different ball game.
That kind of confidence isn’t found in a book; it’s built on the driving range. But I’m not talking about mindlessly banging a bucket of balls. I mean purposeful, focused practice with drills that give you instant, undeniable feedback on what your club is really doing. The goal is to turn those awkward, mechanical thoughts into pure, repeatable feel.
Start Small and Build Momentum in Golf
Before you even think about grabbing your driver, take out a 9-iron or pitching wedge. Shorter clubs are way easier to manage, making them the perfect tools for ingraining a new swing path without your old habits taking over.
Start with small, half-swings. Your only focus should be on the setup adjustments and the feeling of the swing path. For a fade, really sense that club moving from out-to-in. For a draw, get a feel for that in-to-out motion. By slowing things down and shortening the swing, you can nail down the quality of the movement. Forget about power for now—that comes later. This is the fastest way to learn how to hit a fade or draw when you need it most.
The Alignment Stick Gate Drill in Golf
This is my all-time favorite drill for path feedback. It’s brutally honest and incredibly effective because it takes all the guesswork out of the equation.
Here’s how you set it up:
- To Groove a Fade: Place an alignment stick a few feet in front of your ball, just outside the target line. Now, place a second stick a few feet behind the ball, just inside the target line. This creates a “gate” you have to swing through, forcing that out-to-in path.
- To Groove a Draw: Just flip the setup. Put the front stick inside the target line and the back stick outside it. This gate now guides you into a perfect in-to-out swing.
If you hit a stick, your path was off. It’s that simple. There’s no ambiguity. You’re either swinging through the gate or you’re not, which is exactly the kind of direct feedback that accelerates learning.
To help you get started, here are a few simple but powerful drills you can take to the range today. By focusing on how to hit a fade or draw, you can develop a better feel for shot shaping.
Shot Shaping Practice Drills in Golf
Simple and effective drills you can use at the range to master both the fade and the draw.
| Drill Name | What It Fixes | How to Do It |
|---|---|---|
| Gate Drill | Incorrect swing path | Use two alignment sticks to create a “gate” that forces either an in-to-out (draw) or out-to-in (fade) swing path. |
| Foot Back Drill (Draw) | Promotes an in-to-out path | At address, pull your trail foot back a few inches from your normal stance. This closes your stance and makes it easier to swing from the inside. |
| Foot Forward Drill (Fade) | Promotes an out-to-in path | At address, pull your lead foot back a few inches (opening your stance). This makes it more natural to swing across the line from the outside. |
| Towel Under Arm Drill | Disconnected arms/body | Place a small towel under your lead armpit (for a draw) or trail armpit (for a fade). Keep it there throughout the swing to promote a connected rotation. |
Consistently working on these drills will build the muscle memory you need so you can stop thinking about mechanics and start seeing the shot you want.
The ultimate test of your shot-shaping ability is the classic nine-shot drill, made famous by Tiger Woods. It’s a true measure of total ball control. The goal is to hit nine different shots with the same club: a high, medium, and low fade; a high, medium, and low straight ball; and a high, medium, and low draw.
Mastering this drill gives you the versatility to handle pretty much any situation the course throws at you. You’re not just controlling the curve anymore; you’re controlling the trajectory, too. That’s when you go from just playing golf to really playing golf. Ultimately, practicing how to hit a fade or draw will lead to greater consistency and control in your game.
FAQ’s
For more insights on how to hit a fade or draw effectively, check out our other resources.
Let’s be honest, even when you’ve got the perfect setup in your mind, the ball doesn’t always cooperate. That’s just golf. Your planned baby fade can balloon into a high, weak slice, and that nice little draw can suddenly snap into a low, nasty hook. Don’t get frustrated—these are classic growing pains when you’re learning to shape shots.
Learning how to hit a fade or draw can take time, but with patience, you’ll see improvement.
The key is learning to diagnose what’s going wrong right there on the range. Most of the time, the problem is just an exaggeration of what you’re trying to do. You’ve either taken the swing path to an extreme or lost control of the clubface at the moment of truth.
Let’s dig into the common misfires and how to get your ball flight back on track.
When Your Fade Turns Into a Slice
A slice is just a fade on steroids. It happens when you put way too much side spin on the ball, usually from a swing path that cuts way too far across the ball from “out-to-in.” Combine that with a clubface that’s wide open to that path, and you’ve got a recipe for disaster. This is that classic “over-the-top” move you hear about, where the arms and shoulders take over.
What’s Likely Happening: You’re probably starting your downswing with your upper body, forcing the club out and away from you. This creates a steep, chopping-down motion on the ball.
How to Fix It: Try this feeling: as you start the downswing, keep your back turned to the target for just a fraction of a second longer. This simple move helps the club drop down on a much better, shallower plane, neutralizing that steep, slice-inducing path.
When Your Draw Turns Into a Hook
Ah, the dreaded hook. This happens when the clubface slams shut way too fast compared to your in-to-out swing path. While you need that in-to-out path for a draw, when it gets too extreme and your hands get too flippy, you’re going to hit that low, diving shot that’s heading for the trees on the left.
A key thing to remember is that an extreme swing path—whether it’s too far in-to-out or out-to-in—forces you to make a huge last-second compensation with the clubface just to start the ball near your target. That’s a really tough way to play consistent golf.
First, check your setup. Sometimes golfers get so focused on hitting a draw that they close their stance way too much, which practically forces the club too far to the inside. Also, check your grip pressure. A grip that’s too light can let the hands get overly active and snap the clubface shut at impact.
Here’s a great drill to try: Practice hitting some shots where you feel like you’re holding the clubface’s angle through impact for a little longer. This will help you resist that quick, handsy rollover and teach you how to hit a fade or draw with real control, not just by accident.
At Golf Inquirer, we’re all about helping you understand your game better so you can enjoy it more. For more tips from the trenches, course reviews, and gear guides that get to the heart of golf, pay us a visit at https://golfinquirer.com.